A thin metal panel may have enough strength for your project but too little thickness to hold useful threads on its own. A threaded insert gives a screw a secure place to attach, without a loose nut behind every hole.
Two common choices are PEM nuts and rivnuts. Here is how each works, how they are installed, and what to consider when designing a bracket, enclosure, or equipment panel.
See where each fastener goes
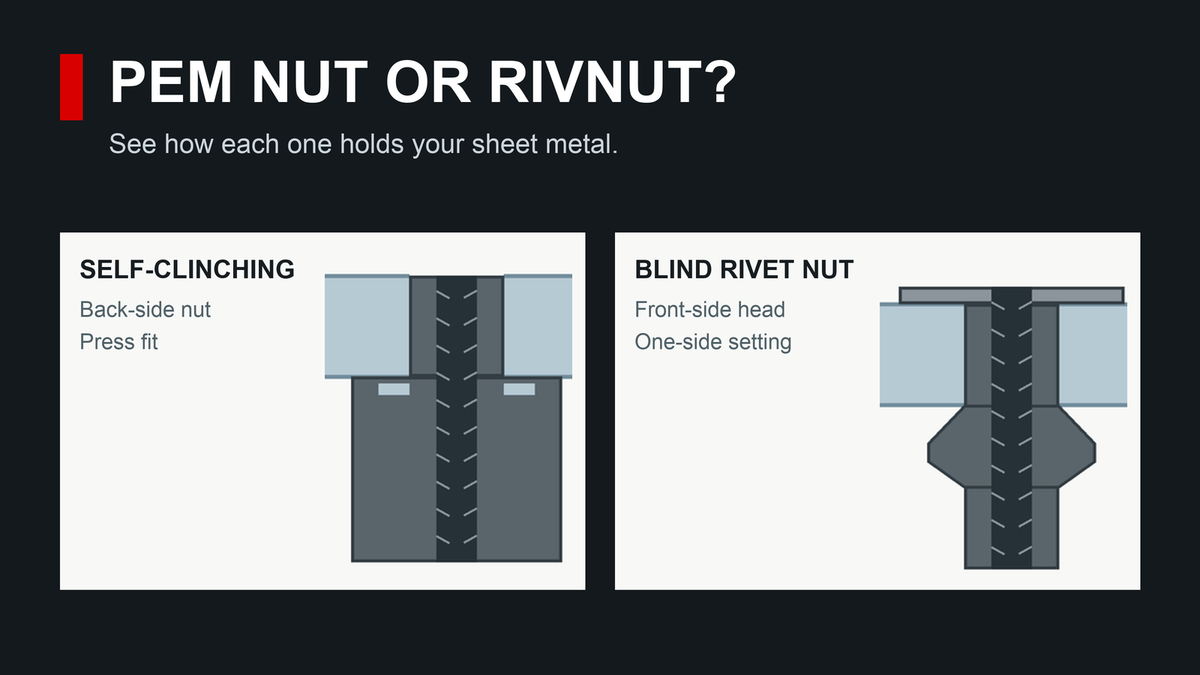
These are side cutaways. “Bolt side” means the face where the screw enters later; “back side” is the opposite face. The blue shape is your sheet metal, and the dark gray shape is the threaded fastener. The drawings show common installation arrangements, without specifying a particular size.
Self-clinching nut: pressed in from the back
A short locating shank enters the hole from behind. The wider threaded nut remains on the back of the sheet.


What holds it? Sheet metal is squeezed into a recess on the nut. Installation tooling must reach both sides of the sheet.
Blind rivet nut: set from the bolt side
The long hollow barrel goes through the hole from the accessible face. Its thin head rests against that face.


What holds it? The sheet is clamped between the front head and the bulge on the back. The tool works from the bolt side only.
Surface detail: The drawing shows a low-profile rivnut head, which still sits slightly proud of the sheet. Head styles vary. A truly flush front face generally calls for a suitable countersunk insert and the hole preparation specified for it. These drawings are for understanding, not manufacturing dimensions; always use the chosen fastener’s data sheet.
What is a PEM nut?
PEM is PennEngineering’s fastener brand. In this comparison, a “PEM nut” means a self-clinching nut: a threaded fastener that becomes permanently attached to a metal sheet.
For the back-side installation shown above, a press squeezes the nut into a correctly sized hole from behind the sheet. Its short shank ends at the bolt-side face; the wider nut body stays on the back. Metal around the hole moves into a recess in the fastener, locking it in place. Features around the nut help resist rotation when a screw is tightened.
Benefits for sheet metal assemblies
- Fewer loose parts: the nut stays with the panel during handling and assembly.
- Reusable threads: a cover or component can be removed and reattached.
- No welding heat: installation uses pressure.
- Production consistency: a properly set up press supports repeat installation across a batch.
The fastener must suit the sheet’s material, hardness, and thickness. Different PEM styles have different limits; a nut suitable for aluminum is not automatically suitable for stainless steel. See PennEngineering’s explanation of self-clinching technology.
How a PEM nut is installed
- Select the exact fastener and prepare its specified mounting hole.
- Position the sheet and nut between the correct press tools. Conventional clinch-nut installation needs tooling access on both sides.
- Apply controlled squeezing force with parallel tools until the fastener is properly seated.
- Check seating and threads; confirm performance for the application before a production run.
Important hole detail: follow the fastener’s instructions before deburring or countersinking its mounting hole. Removing that material can reduce the metal available to clinch. A hammer blow is not a substitute for the specified press installation. PennEngineering publishes nut selection charts and installation guidance.
What is a rivnut?
A rivnut, also called a blind rivet nut, is a threaded insert installed through a hole from one side. “Blind” means the installer does not need access behind the panel.
A setting tool pulls on the insert’s threads while supporting its head on the bolt side. The body forms a bulge behind the material, trapping the panel between that bulge and the head. With a low-profile style, only a thin flange remains above the bolt-side surface; the head itself does not flatten during installation.
Benefits when access is limited
- One-side installation: useful for hollow tubing and closed housings.
- Flexible timing: suitable styles can be installed after painting or coating.
- Portable installation: hand, battery, or powered tools can suit assembly and retrofit work.
Böllhoff describes these applications in its RIVNUT product guide.
How a rivnut is installed
- Choose the thread, body style, and grip range—the material thickness the insert is designed to clamp.
- Prepare the specified hole and thread the insert onto the tool’s mandrel.
- Seat the head against the panel, keep the tool square, and apply the specified setting force or stroke.
- Unthread the tool and inspect the installation.
An incorrect hole, grip range, or tool setting can leave an insert poorly retained or damage it. Use the selected product’s specifications, including bolt tightening limits. Böllhoff’s installation and selection catalog explains the setting sequence.
PEM nuts vs rivnuts: a practical comparison
| Consideration | PEM self-clinching nut | Rivnut |
|---|---|---|
| How it stays in place | Sheet metal flows into the fastener’s recess. | The insert deforms behind the material. |
| Installation access | Press tooling on both sides. | Tool access from one side. |
| Typical opportunity | Accessible sheet metal during production. | Hollow sections, enclosed parts, and retrofits. |
| Key selection checks | Sheet hardness, thickness, hole size, and edge distance. | Grip range, hole size, body style, and setting parameters. |
Which fits your project?
Start with access: If a press can reach both faces of suitable sheet metal during fabrication, consider a self-clinching nut. If the back is closed off, such as inside a tube or assembled enclosure, consider a rivnut. Then confirm the exact hardware against the material, loads, hole, and installation instructions.
Example: a batch of enclosure panels. If both sides are accessible during fabrication and the sheet meets the fastener requirements, clinch nuts may simplify later cover installation. Plan the hardware location and installation sequence before cutting and forming.
Example: a bracket added to closed rectangular tubing. A rivnut may be the practical choice because a press cannot reach inside the tube. Confirm room behind the wall for the insert to form.
Example: a painted assembly receiving a new accessory. A suitable rivnut may allow installation late in the process. Check the coating, hole preparation, and chosen insert’s instructions.
Strength depends on the exact fastener, parent material, geometry, and installation. Compare manufacturer performance data and test the actual joint when loads matter. There is no universal strength winner.
What to include in a quote request
- Material grade, thickness, quantity, and part revision.
- Thread size and exact fastener part number, if specified.
- Hardware locations, installation direction, and coating requirements.
- A dimensioned drawing showing important assembly requirements.
- A DXF for flat laser-cut parts, or a 3D STEP file if forming is required.
KRAZO Laser offers PEM fastener installation alongside laser cutting and press brake forming. Send your requirements for review so hardware can be considered with the rest of the manufacturing work.
Request a production quote or email drawings to quotes@motobilt.com.